

Scratches on stainless steel cookware are normal and, for most types, safe to continue cooking with. The alloy forms a self-repairing chromium oxide layer that prevents significant metal migration into food. Light surface marks and transfer scuffs can be reduced with Bar Keepers Friend or a baking soda paste — but deep gouges cannot be fully removed, only minimized. The most common mistake is over-buffing in the wrong direction, which creates a larger damaged area. This guide covers how to identify what you have, what to realistically expect from repair, and how to protect your pans going forward.
Not All Marks Are Scratches: A Quick Diagnosis
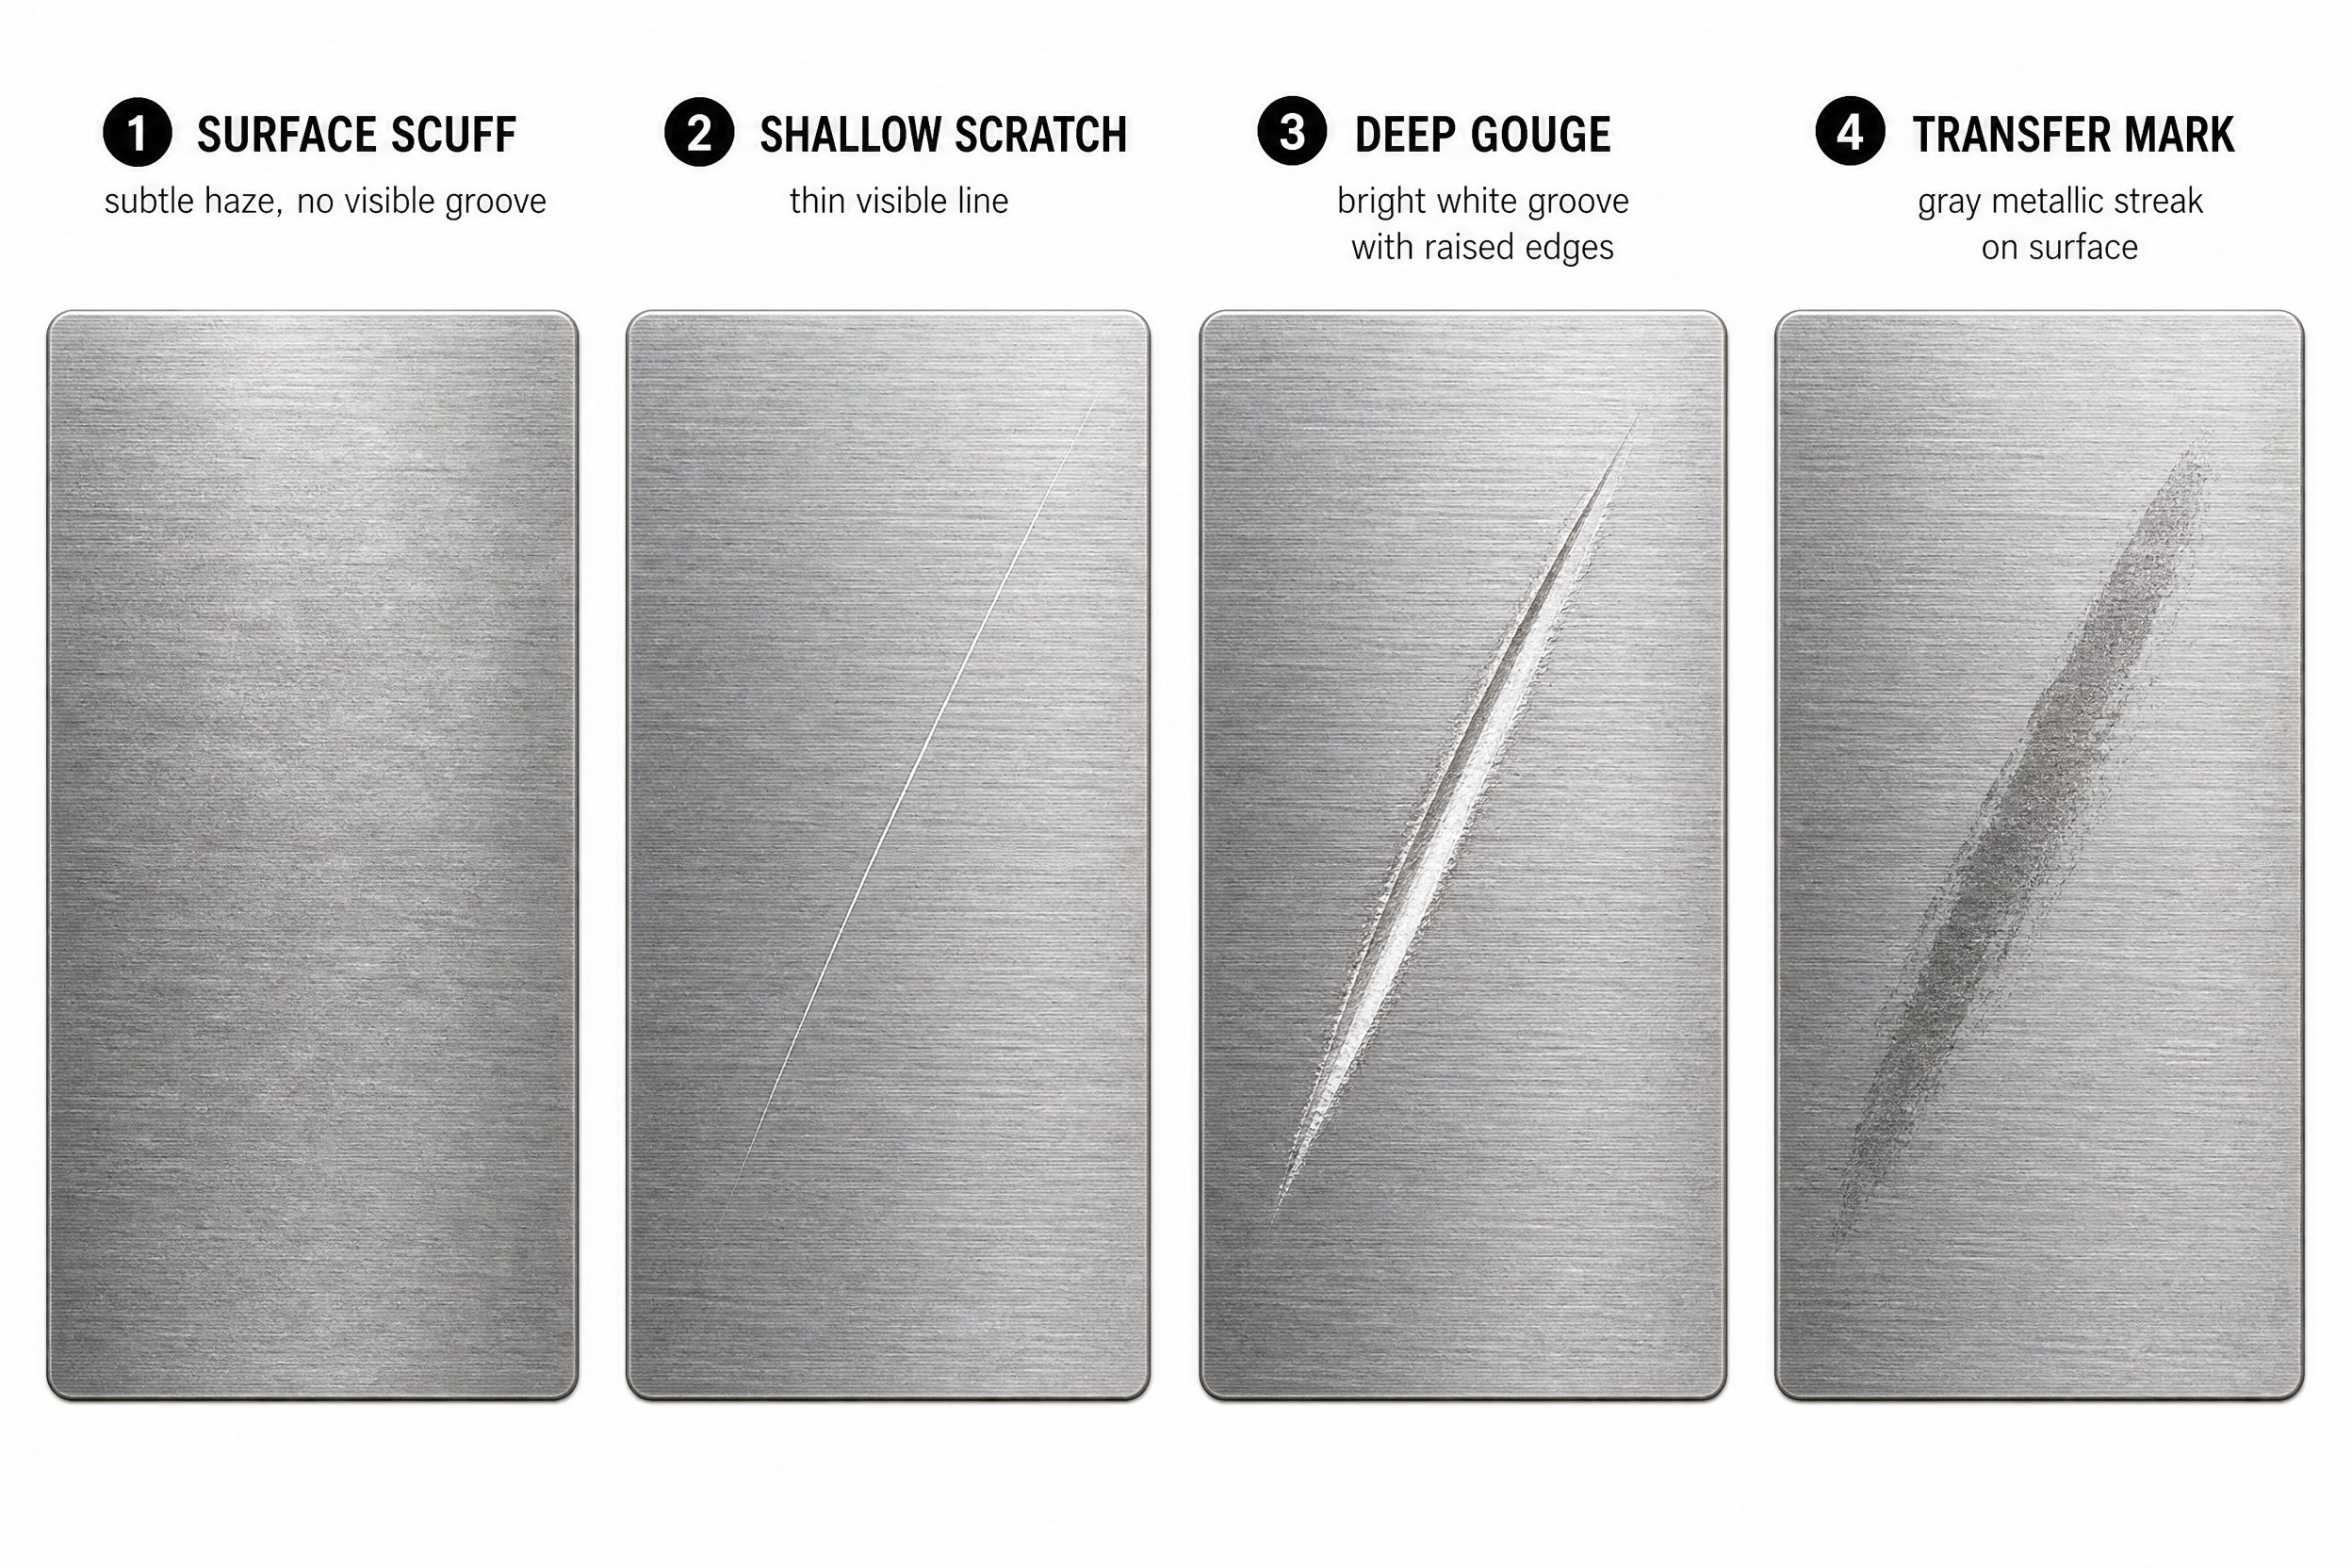
Before reaching for any abrasive, identify what you’re actually looking at. Most people call everything a “scratch,” but the marks on stainless steel cookware fall into four distinct categories — and the right response depends entirely on which type you have.
Surface Scuffs are the faintest marks: a light haze or dulling of the surface finish, often caused by dishwasher detergent or cleaning pads moving against the grain. Run your fingernail across the mark. If you feel nothing — no groove, no ridge — it’s a scuff. These are almost always reversible.
Shallow Scratches create a visible line but no perceptible depth. You can feel a very faint groove with your fingernail. These are the ones Bar Keepers Friend was made for. With the right technique, they can be reduced to near-invisible on brushed finishes, though a completely clean result is rare.
Deep Gouges have a clearly felt groove and may show a bright, almost white line against the brushed surface. These cannot be removed — the steel has been physically displaced. The best you can do is feather the edges so the gouge blends better with the surrounding finish. Any attempt to fully remove a deep gouge by sanding will create a larger polished area that looks more out of place than the original mark.
Transfer Marks are the gray or silver streaks left when aluminum or other softer metals drag across stainless steel. This happens when you use aluminum spatulas, when pans stack in a drawer, or when the pan slides against an aluminum rack. These are not scratches at all — no steel was removed. They’re aluminum deposits sitting on top of your pan, and they come off easily with a mild acid cleaner or baking soda paste. Many people mistake them for damage when they’re actually just residue.
Knowing which type you have shapes every decision that follows.
Are Scratched Stainless Steel Pans Safe to Use?
Yes — for the vast majority of cases. The safety of scratched stainless steel cookware comes down to the alloy’s metallurgy, and the short version is that stainless steel is engineered to resist corrosion precisely because of how it behaves when its surface is disturbed.
Stainless steel derives its corrosion resistance from chromium, which makes up at least 10.5% of the alloy by weight. When chromium is exposed to oxygen — whether from air or water — it instantly forms a microscopically thin layer of chromium oxide on the surface. This is called the passivation layer. It’s only a few nanometers thick, but it acts as a chemical barrier between the steel and whatever contacts it. When you scratch the pan, you break this layer. But here’s the key: it re-forms within seconds when exposed to air. The pan effectively heals itself at a molecular level.
The concern about toxin leaching comes primarily from a real 2013 study (Kamerud et al., published in the Journal of Agricultural and Food Chemistry) that measured chromium and nickel migration into food during repeated cooking cycles — particularly with acidic foods like tomato sauce. The study did find elevated metal levels compared to unscratched or new pans. What social media posts rarely mention: the migration levels measured remained well within established safety reference values. The European Food Safety Authority’s tolerable daily intake for nickel is 13 µg per kilogram of body weight per day; for chromium, no upper tolerable intake level has been established because chromium(III) toxicity at dietary levels is not well documented. The study’s own conclusion noted that in normal culinary use, the levels detected posed no health concern for most people.
The one exception worth noting is nickel sensitivity. Roughly 8–10% of the population has a documented nickel allergy. For people with diagnosed nickel hypersensitivity, the Kamerud study’s findings are more relevant — even sub-threshold nickel migration can trigger a local reaction. If you have a confirmed nickel allergy, consider replacing heavily scratched pans with 18/0 grade stainless steel (which contains no nickel) or ceramic cookware. For everyone else, continued use of a scratched 18/10 pan presents no documented health risk at normal cooking temperatures.
One practical note: cooking acidic foods for extended periods in deeply scratched pans does increase metal migration more than cooking neutral foods. Simmering tomato sauce for 4 hours in a badly gouged pan is the highest-risk scenario the research identified — still within safe limits, but worth being aware of if you cook acidic dishes regularly.
Interior vs. Exterior: Two Different Conversations
Most scratch guides treat all surfaces of a pan as equivalent. They’re not. The interior cooking surface and the exterior require completely different thinking — both for safety and for repair.
Interior cooking surface scratches are the ones the safety discussion above applies to. The passivation chemistry, the Kamerud study, the nickel concerns — all of that is about your food-contact surface. When evaluating whether to repair an interior scratch, the question to ask is: has the surface character changed? A light scuff or shallow scratch that doesn’t create a rough texture won’t affect food release, seasoning, or cooking performance. A deep gouge that catches your fingernail creates a crevice where food particles can lodge and be harder to clean. That’s when repair (or at minimum, aggressive cleaning) becomes worth the effort.
Attempting aggressive sanding on the interior of a pan to remove deep gouges is not recommended unless you can match the original finish exactly — an uneven sanded patch on the cooking surface can create hot spots and uneven food release patterns that affect performance more than the original scratch did.
Exterior surface scratches are entirely cosmetic. The outside of a stainless steel pan has no food contact, and the passivation layer on the exterior faces no culinary acid exposure. Here, the only question is aesthetic: does it bother you? Exterior polishing is where the elbow-grease repair methods are most appropriate and least risky — you can be more aggressive with abrasives without any functional consequence.
The bottom line: For interior marks, assess whether the texture has actually changed before attempting repair. For exterior marks, use whichever method matches your pan’s finish and desired result.
How to Remove (or Reduce) Scratches — By Finish Type
The method you use depends on your pan’s surface finish. Using the wrong abrasive on the wrong finish is how people go from “one small scratch” to “a large visibly polished patch that looks far worse.” The three finishes you’ll encounter on stainless steel cookware are brushed (also called satin), mirror-polished, and bead-blasted. The vast majority of everyday stainless steel cookware uses a brushed finish.
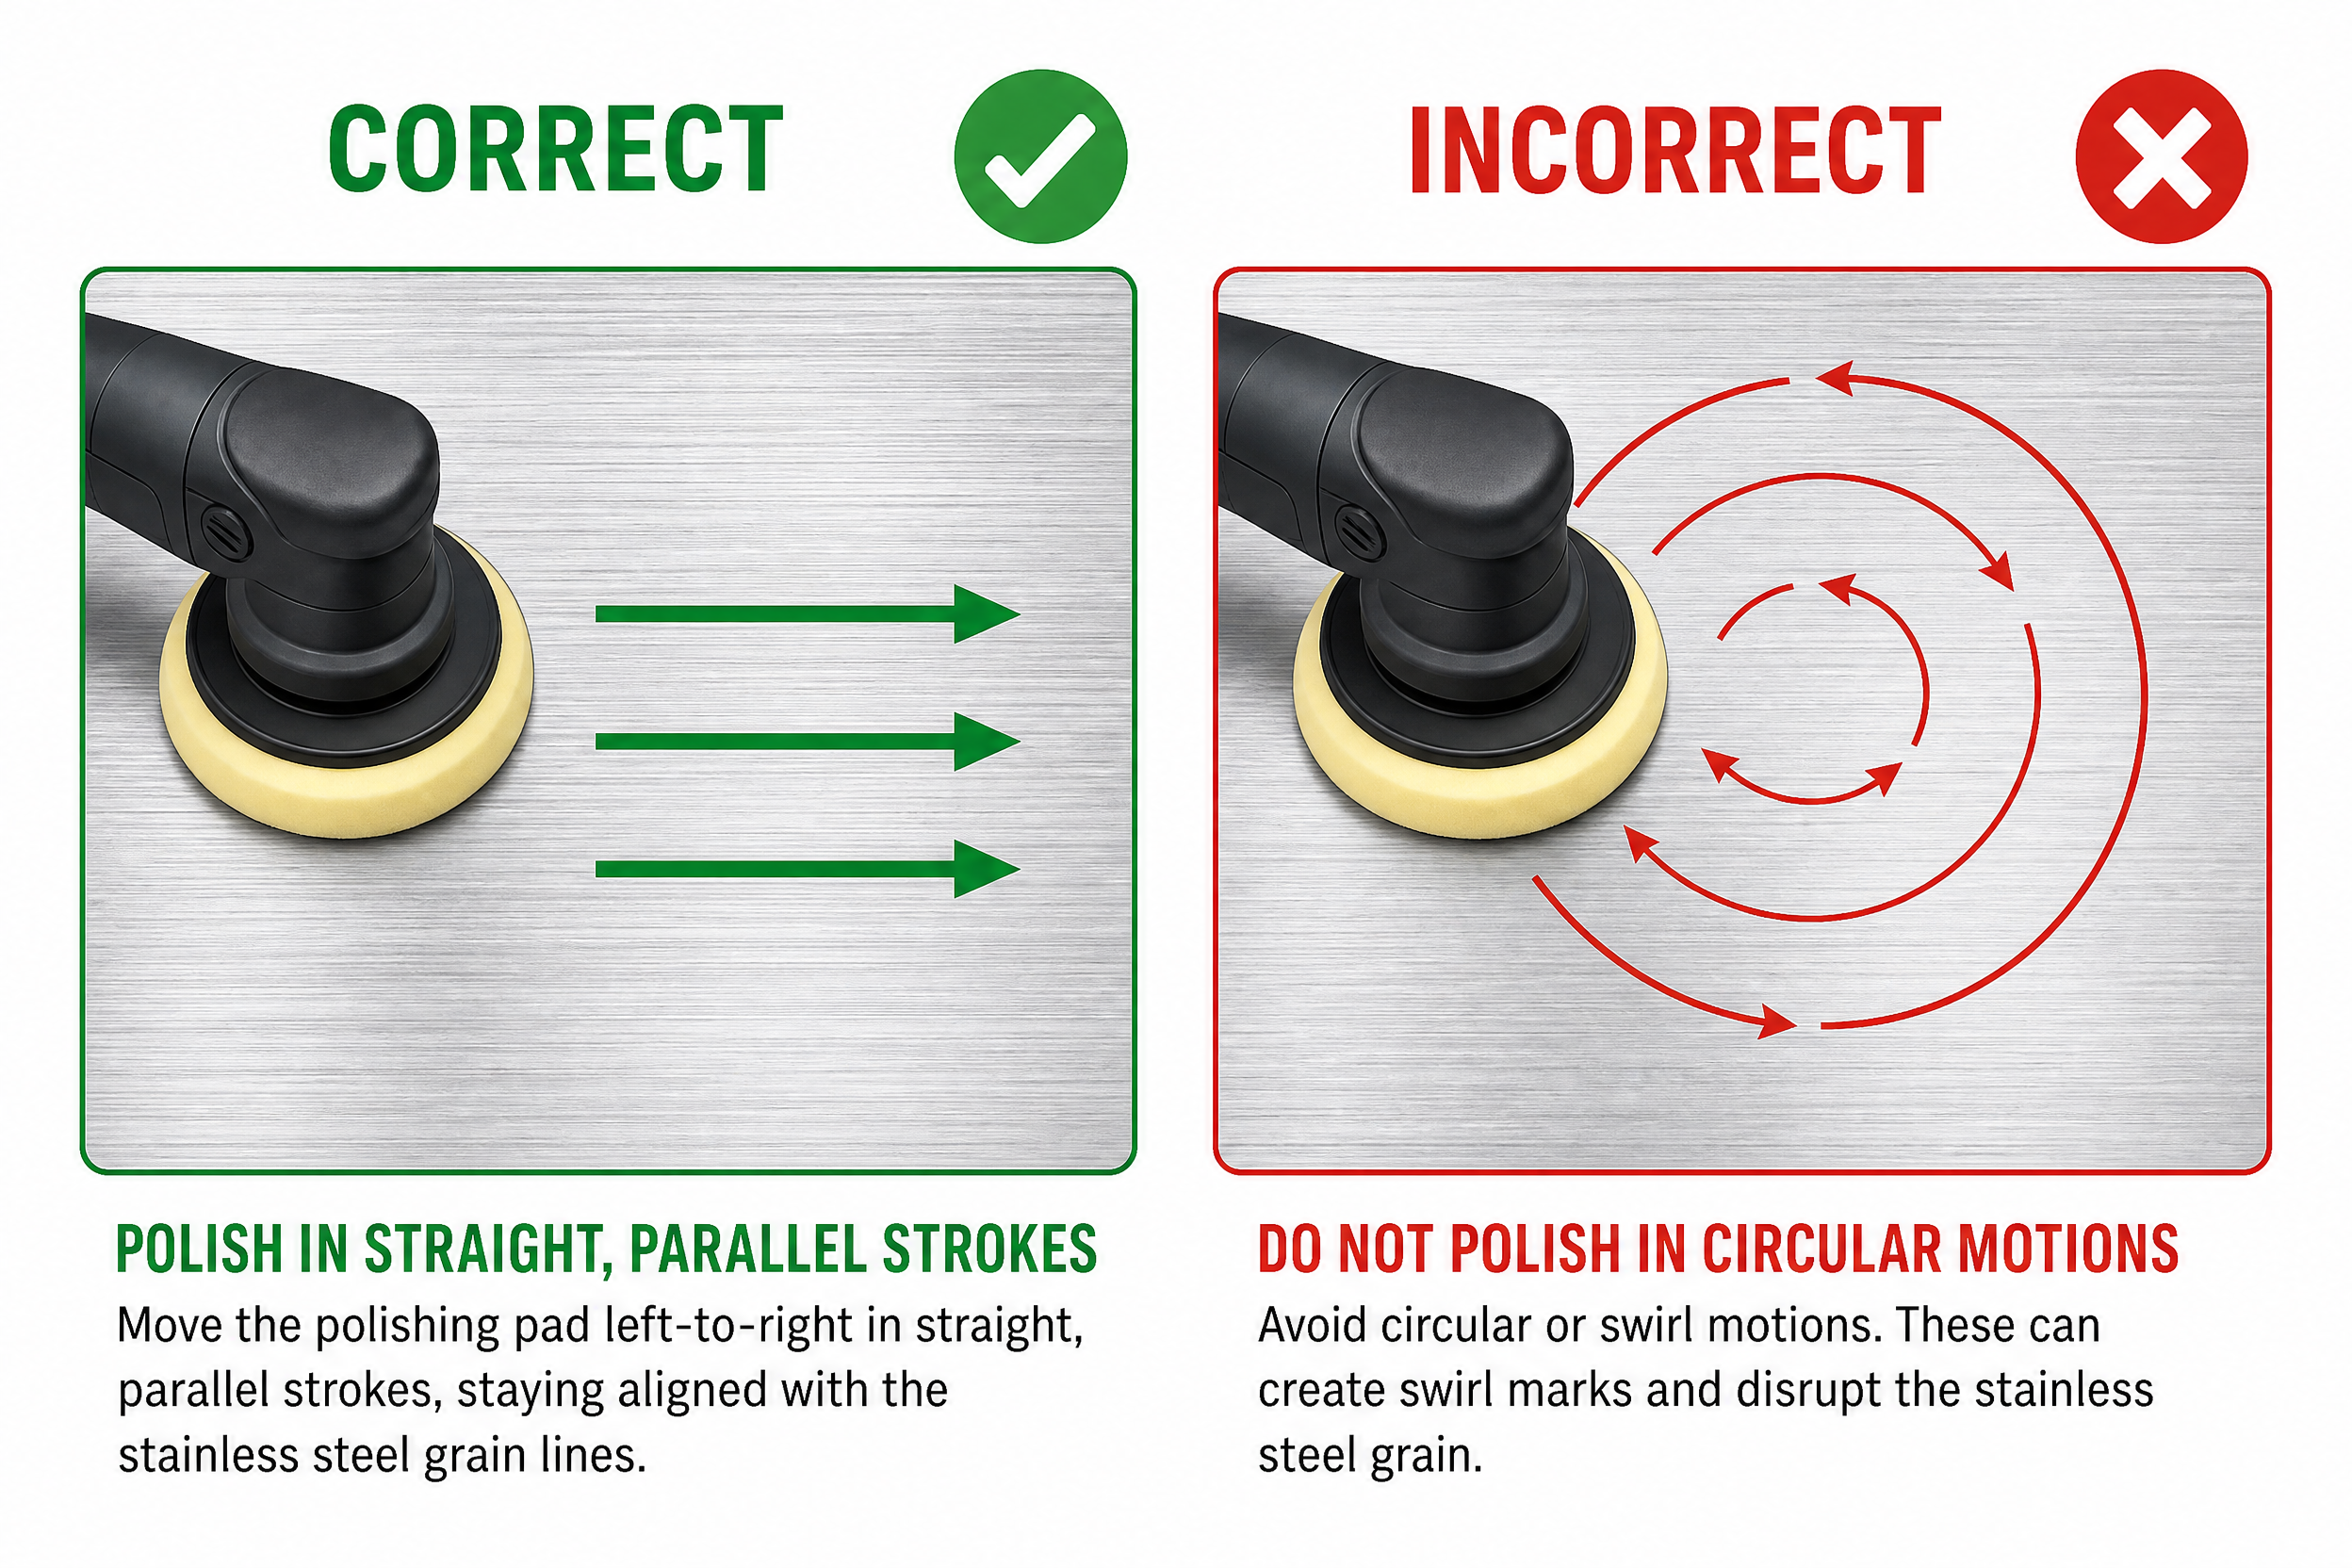
Before any method: identify the grain direction. Brushed stainless steel has a directional grain — tiny parallel lines from the factory polishing process. Always work with the grain, never across it. Working across the grain creates new, highly visible cross-hatch marks. To find the grain, hold the pan under a bright light at a low angle and look for the direction of the fine parallel lines. On most pans, the grain runs in one consistent direction on each surface.
For Brushed/Satin Finish Pans (Most Common)
Method 1 — Transfer Marks and Surface Scuffs: Baking Soda Paste
Mix baking soda with just enough water to form a thick paste. Apply to the affected area with a soft cloth or non-scratch sponge. Rub firmly in the direction of the grain for 30–60 seconds. Rinse and dry. This works well on aluminum transfer marks (those gray streaks from metal utensils or stacking) and on light surface scuffs. The mild abrasive in baking soda is fine enough not to create new marks on brushed steel.
Method 2 — Shallow Scratches: Bar Keepers Friend Powder
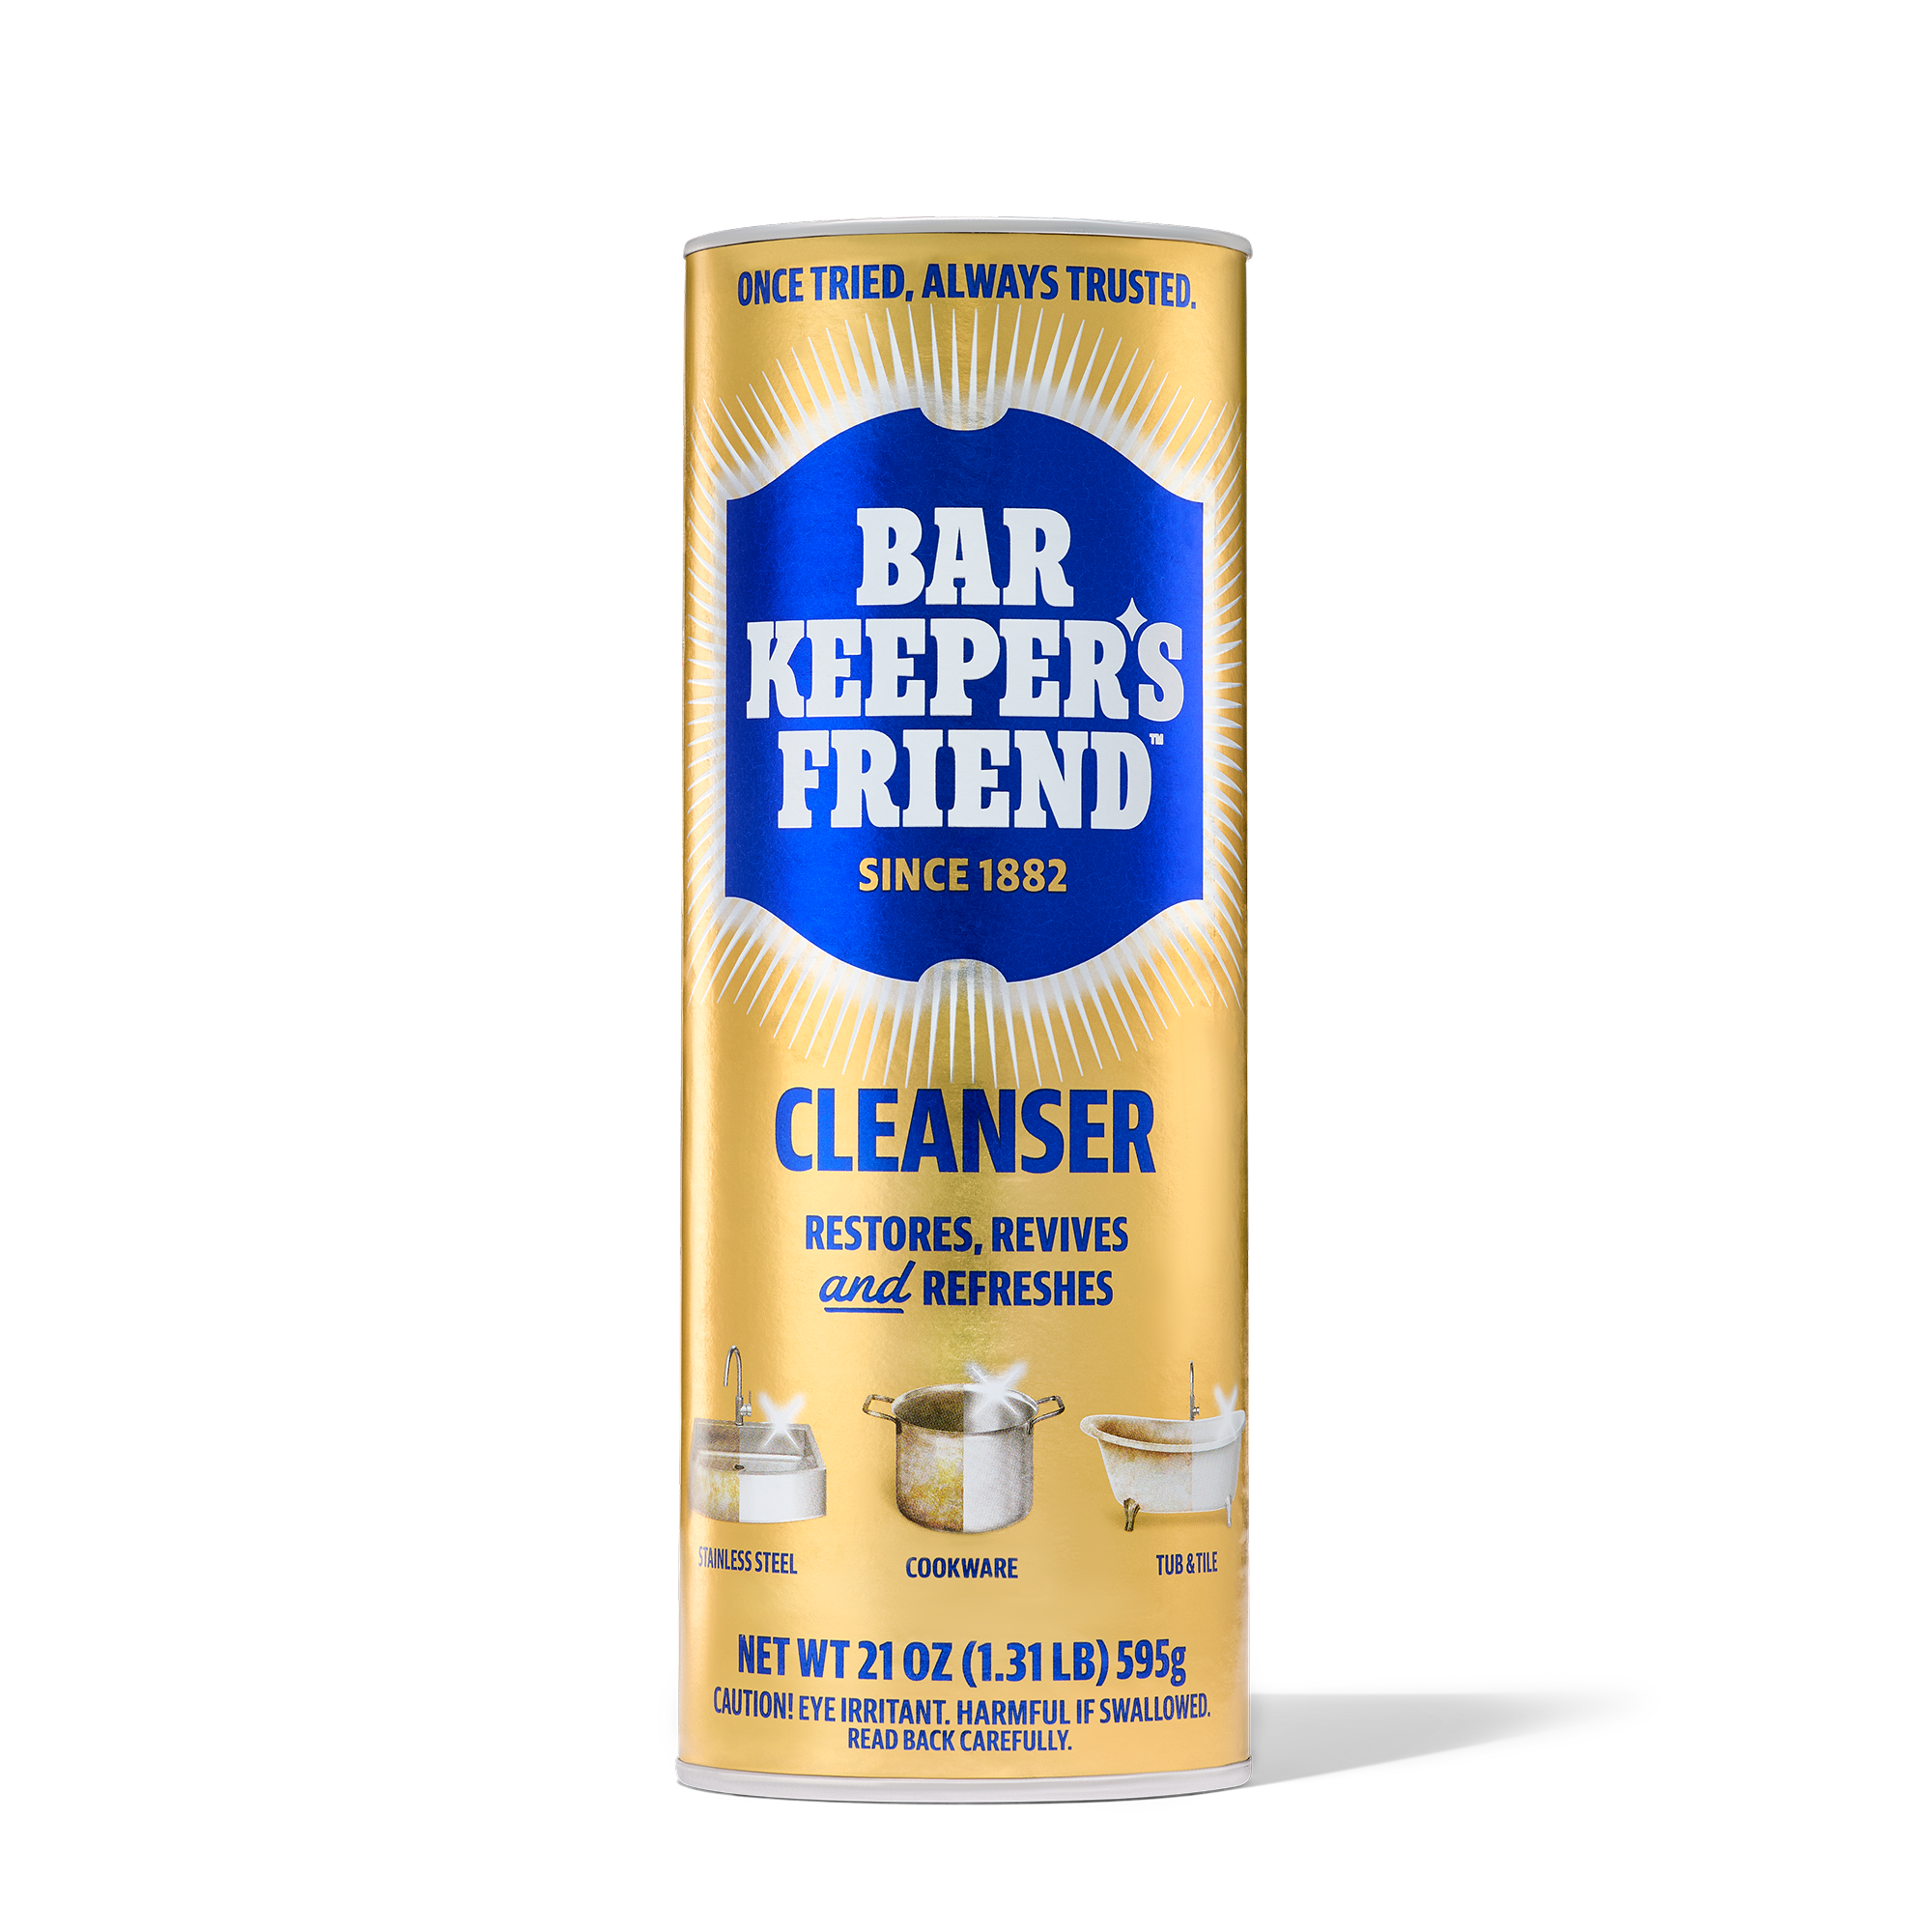
Bar Keepers Friend Powder (the powder form, not the soft cleanser, which has lower grit) is the most effective widely available product for shallow scratch reduction on brushed stainless steel. Wet the surface, apply a small amount of powder directly, and use a non-scratch pad (Scotch-Brite’s blue or green non-scratch pads) to work it in — always in the grain direction. Use short, straight strokes, not circular. Circular motion creates swirl marks that are impossible to remove without re-polishing the entire surface.
After a few passes, rinse and assess under good light. Repeat if the scratch is still prominent. Set realistic expectations: a shallow scratch can often be reduced to near-invisible on a brushed finish, but if you can still feel it with your nail, you likely won’t eliminate it entirely.
Method 3 — Moderate Scratches: Scotch-Brite Pads + BKF (Graduated Approach)
For scratches that are still visible after Method 2, you can step up to a Scotch-Brite gray ultra-fine pad with BKF Powder, still following the grain direction. After working the scratch area, you’ll need to “blend” the surrounding surface — run the pad lightly over the full panel (not just the scratch) so the polished patch doesn’t stand out. This takes practice and patience. If you have an All-Clad D3 or similar pan with a distinct No. 4 brushed finish, blending is essential or the repair will be more noticeable than the original scratch.
For Mirror-Polished Pans
Mirror-polished stainless steel (like the exterior of some high-end pans) cannot be effectively repaired at home for anything beyond superficial scuffs. The polishing process that creates the mirror finish requires progressively finer abrasives down to sub-micron level — not achievable with kitchen products. A bar keepers friend application on a mirror finish will create a visible dull patch. If you have a mirror finish pan with a meaningful scratch, your realistic options are professional re-polishing or acceptance.
Finish Decision Matrix
| Finish Type | Mark Type | Best Method | Realistic Outcome |
|---|---|---|---|
| Brushed/Satin | Transfer marks / Scuffs | Baking soda paste, grain direction | Full removal likely |
| Brushed/Satin | Shallow scratch | BKF Powder + non-scratch pad, grain direction | Significant reduction |
| Brushed/Satin | Deep gouge | BKF + graduated pads + blend surrounding surface | Edge feathering only |
| Mirror polish | Surface scuff | Soft cloth + mild polish (Flitz, Mothers Mag) | Minor improvement |
| Mirror polish | Any scratch | Professional re-polish only | Not a DIY repair |
| Brushed/Satin | Any mark | Circular motion / cross-grain | Will worsen appearance |
Products That Actually Work (and What They Don’t Do)
There are dozens of products marketed for stainless steel scratch removal, ranging from $4 pantry staples to $30 specialty kits. Here’s an honest breakdown based on what each product can and cannot do.
Bar Keepers Friend Powder is the most consistently effective product for brushed stainless steel scratch reduction. The active ingredients are oxalic acid (which removes surface oxidation and rust staining) and glass oxide as the abrasive — it cleans and lightly polishes in one step. The powder form is more abrasive than the soft cleanser version. Use it for shallow scratches and moderate marks.
Bar Keepers Friend Soft Cleanser has a lower abrasive content and is better suited for routine cleaning and surface scuff removal than for actual scratch repair. Don’t confuse the two — the soft cleanser won’t touch a real scratch.
Baking Soda works well for transfer marks and scuffs because its abrasive level is gentle enough not to create new marks. It’s not strong enough for true scratches.
Scotch-Brite Pads — the color coding matters. Green pads (regular) are too aggressive for polishing a stainless finish and will create new marks. Blue pads (non-scratch) are appropriate for use with BKF on brushed steel. Gray ultra-fine pads (sold separately) are for more targeted refinishing work.
Flitz Paste Polish works on light surface oxidation and minor scuffs, particularly on mirror or semi-polished finishes. Not effective on physically deep scratches.
Commercial “scratch remover kits” (Rejuvenate, Scratch-B-Gone) use pre-cut abrasive pads in a sequence from coarse to fine. They work, but they require committing to working the entire surface to blend — not just the scratch. They’re most appropriate for exterior surfaces where you’re willing to refinish a whole panel, not for spot repairs on a cooking surface.
What no product does: Remove a scratch that has physically displaced material. If the steel is gone, it’s gone. Products that claim to “fill” scratches in stainless steel are marketing nonsense — stainless steel is not a fillable surface material.
Know When to Stop
This is the step no repair guide covers, and it’s the most practically important one.
The instinct when a scratch repair doesn’t work is to apply more pressure, use a more aggressive product, or try again. This is how minor scratches become major ones. Stainless steel’s brushed finish is achieved by precise factory abrasion — once you go beyond the factory’s surface removal in a small area, you create a polished patch with a different reflectance than the surrounding metal. Under kitchen lighting, this stands out more than a single scratch would have.
Set a stopping rule before you start: Do three gentle passes in the grain direction, assess in bright light, and if there’s no meaningful improvement, stop. The exception is if you’re committing to blending the whole surface — in that case, you’re resurfacing a panel, not repairing a spot, which is a legitimate approach but a bigger project.
For the interior cooking surface specifically, the stopping rule is even more conservative. If the gouge doesn’t create a texture that traps food and is difficult to clean, leave it alone. A cosmetically imperfect cooking surface that performs well is far preferable to a uniformly polished interior that you sanded down to create.
Signs that a scratch has moved beyond DIY repair:
- The line is bright white against the brushed background — this indicates a deep gouge through the grain, not just a surface disruption
- Multiple attempts at blending have created a halo of differently-polished metal around the original mark
- The scratch is on a mirror-polished exterior panel
At this point, either live with the cosmetic imperfection (which has no functional impact on a well-built stainless pan) or consult a professional metal polishing service. For premium pans like All-Clad or Made In, the cost of professional re-polishing is often justified by the pan’s value.
Preventing Future Scratches
Most stainless steel cookware scratches are preventable with three habit changes.
Use wood, silicone, or nylon utensils on the cooking surface. Metal utensils — even stainless steel on stainless steel — cause shallow scratches over time, particularly on thinner-gauge pans. The interior of a pan running at 350°F doesn’t need a metal spatula; a stiff silicone or wooden fish spatula works just as well and protects the surface. Reserve metal utensils for cast iron or carbon steel where the surface finish isn’t a consideration.
Never stack pans without protection. The leading cause of hidden interior scratches is pans stacked in a cabinet without pan protectors between them. The rim of one pan drags against the cooking surface of the one below every time you lift it. A set of fabric pan protectors costs about $10 and eliminates this entirely. If you don’t have protectors, stacking a folded dish towel between pans achieves the same result.
Hand wash or select the right dishwasher cycle. Dishwasher detergents contain abrasive compounds and bleaching agents that degrade stainless steel’s passivation layer over repeated cycles and cause the hazy, cloudy appearance that many people describe as “scratches.” Most manufacturers including All-Clad technically allow dishwasher use but recommend hand washing for appearance longevity. If you dishwash, use a gentle cycle and a detergent without chlorine bleach.
Dry immediately after washing. Water spots and mineral deposits from air-drying create surface discoloration that’s often mistaken for scratches but is actually calcium or mineral residue. A quick towel dry eliminates this entirely.
FAQ
Is it safe to keep using a scratched stainless steel pan?
Yes, in almost all cases. Stainless steel forms a chromium oxide passivation layer that re-seals itself within seconds when scratched. The 2013 Kamerud study (J. Agric. Food Chem.), which is frequently misrepresented on social media, found that metal migration from repeated cooking in stainless pans exists but remains within established food safety reference values. The one exception is people with diagnosed nickel allergies, who may want to avoid heavily scratched 18/10-grade pans.
Does Bar Keepers Friend actually remove scratches?
BKF Powder reduces shallow scratches on brushed stainless steel and removes transfer marks and scuffs effectively. It does not remove deep gouges — no consumer product does, because those require material removal beyond what a polishing compound achieves. Use the powder form, not the soft cleanser, for scratch work.
What causes those gray streaks that look like scratches?
Those are aluminum transfer marks — deposits left by aluminum spatulas, other cookware, or oven racks dragging across the steel surface. They’re not scratches; no steel was removed. They respond well to baking soda paste or BKF and usually come off in one cleaning session.
Can I use my stainless steel pan if the inside is scratched?
Yes. An interior scratch that doesn’t create a rough texture has no meaningful effect on safety or cooking performance. If the scratch creates a raised edge or catches food particles, try reducing it with a gentle BKF application in the grain direction, but don’t attempt aggressive sanding on the cooking surface.
When should I throw out a scratched stainless steel pan?
Stainless steel pans don’t need to be replaced because of scratches. The reasons to replace a stainless pan are warped bases (which create uneven heat contact on flat cooktops), compromised handles or rivets, or deep pitting from prolonged acid exposure. Surface scratches, even deep ones, don’t affect the pan’s structural integrity or safety.
Does stainless steel grade affect scratch resistance?
Yes. 18/10 grade steel (austenitic, used in most premium cookware) contains 10% nickel, which makes the alloy softer and more prone to surface scratching than 18/0 grade (ferritic, magnetic, no nickel). Paradoxically, 18/10 also repairs its passivation layer more readily due to higher chromium content. 18/0 is harder and more resistant to scratches but is more commonly found in budget or induction-specific cookware.
Final Thoughts
Scratches are an inevitable part of cooking with stainless steel, not a sign of a failing pan or a safety emergency. The pans most worth worrying about are the coated ones — nonstick pans with damaged PTFE or ceramic coatings where the underlying material can be exposed. Stainless steel, by design, is the coating.
The practical takeaways: Know what type of mark you have before attempting repair. Set realistic expectations — surface scuffs and transfer marks are fully reversible; shallow scratches can be significantly reduced; deep gouges can only be feathered. Always follow the grain direction, stop before you create a bigger problem, and protect your pans from stacking damage going forward. A scratched stainless steel pan with good gauge and bonded construction is still a better pan than a pristine-looking nonstick that’s a year old.